Notes (Practical)
External JavaScript
Up to this juncture we have have been placing our JavaScript internally within out <html> document. While this works for small experimentations it is not considered best practice as we are mixing programming logic with document presentation. To separate these concerns we can use external JavaScript:
Including javaScript in an external file
Just like with CSS it's considered good practice to separate the javaScript code from our HTML. The <script> tag allows us to utilise the src attribute to include javaScript contained in an external file. The following conventions must be adhered to:
- The external file should have a
.jsextension - You do not need to use the
<script>tag in the external.jsfile
Below we include
demo_script_src.jswhich lives in a scripts folder
...
<head>
    <script src="scripts/demo_script_src.js">
</head>
...
Conditional Statements
In order to code decisions into our javaScript programs it's necessary to use conditional statements know as if statements.
An if statement is a conditional statement which checks to see if a statement is true or false and then executes some additional statements depending on the result.
In javaScript a basic IF statement looks as follows:
if (condition) {
    //code to be executed if condition is true
}
A real example
//check if the statement 5 > 3 is true and if so
//then print a suitable message
    if (5 > 3){
        console.log("It is bigger!");
   }
We can also specify an alternative by using an else as follows:
if (5 > 3){
        console.log("It is bigger!");
}else {
        console.log("It is smaller");

}
The bigger than symbol > is know as a comparison operator. You may want to make use of the following operators:
| Operator | Description |
|---|---|
| == | equal to |
| != | not equal |
| > | greater than |
| < | less than |
| >= | greater than or equal to |
| <= | less than or equal to |
We can only have 1 else with every if. If we want to specify more than one alternative then we have to use else if.
Consider the following example:
if (role == "Teacher"){

    console.log("You are a teacher!");

}

else if (role == "Student"){

    console.log("You are a student!");

}

else if (role == "Admin"){

    console.log("Your are an admin");

}

else{

     console.log("I don’t know what you are!");

}
In the above example you will notice that an else if statement is used
to specify alternative paths and that you can have more than 1 else if statement. In fact, you can have as many else if statements as you like.
Multiple conditions
You can join together different conditions with "or” or “and” statements, to test whether either statement is true, or both are true, respectively.
In JavaScript “or” is written as || and “and” is written as &&.
Say you want to test if the value of x is between 10 and 20—you could do that with a condition stating:
if(x > 10 && x < 20) {
    console.log('x is between 10 and 20')
}
If you want to make sure that country is either “England” or “Germany” you use:
if(country === 'England' || country === 'Germany') {
    ...
}
Notice, in the above example, I have used the === operator. This is more precise than == as it matches by data type.
Adding Event Listeners
Although we've not formally introduced the concept, we've already used JavaScript event driven capabilities. Remember this bit of code:
The HTML
<p> <button onClick="showName()">Click Me</button> </p>
The JavaScript
function showName(){
    // insert instructions
} //end function
In the above example we're listening for a click event via the implementation of onClick="showName() attribute. The browser will then invoke the function showName() when the click event occurs. Functions that react to events are known as event handlers.
JavaScript Events
So far, we've only looked at one event, onClick. There are however many different events that we can react to. Here are some of the most common:
onchange- An HTML element has been changed . E.G. a form has been updatedonclick- The user clicks an HTML elementonmouseover- The user moves the mouse over an HTML elementonmouseout- The user moves the mouse away from an HTML elementonkeydown- The user pushes a keyboard keyonload- The dom has loadedinput- Fires any time a user types into an input box
Adding Event Listeners
There are two main ways to add event listeners:
- Using an inline attribute to add a call back function (up to this point how we've added event listeners)
- Adding an the event listener using javaScript
Just like with HTML we want to, where possible, avoid the use of inline elements. Therefore, in most cases it's advantageous to add event listeners using javaScript.
We've seen the below example before, however we're now adding the callback using javaScript and also using an external .js file
demo.html
<html>
	<head>
        <script type="text/javascript" src="scripts/event_demo.js">  </script>
	</head>
	<!-- we use onload here to initiate our program -->
    <body onload="main()">
    		<input  id="userName" type = "text" placeholder = "Enter Name">
			<!-- An event listener will be added to the button using javaScript -->
            <button id="button"> Click Me </button>
            <p id = "output"><!-- result will be placed here --> </p>
	</body>

</html>
scripts/event_demo.js
/**
    Main Function is invoked when the html
    page has loaded

**/
function main() {
    //reference an html element
    var myButton = document.getElementById("button");
     //myButton holds a reference to our button element
    //we can now add a on click event
    myButton.addEventListener("click", buttonClicked)

}

/**
  buttonClicked call back function
**/

function buttonClicked() {
   //get the value entered into the user name
   var myUserName = document.getElementById("userName").value
   //ouput to our p tag
   document.getElementById("output").innerHTML = "Hello " + myUserName;
}
In the above example notice how clean our HTML is. The only inline event listener we add is <body onload="main()"> this effectively initiates our program when the document has loaded. Also note when we set up an event listener using javascript we can omit the "on" for the event name.
myButton.addEventListener("click", buttonClicked) //onclick becomes click
If you want to do not want any inline event listeners you can use the DOMContentLoaded event.
addEventListener('DOMContentLoaded', main)
});
Loops in javaScript
Loops are a fundamental concept in computer programming. They allow us to repeat a set of one or more instructions a desired number of times.
Consider a simple javaScript program where we log "Solent University" to the console 5 times. You may take the following approach in solving this problem:
	console.log("Solent University");
	console.log("Solent University");
	console.log("Solent University");
	console.log("Solent University");
	console.log("Solent University");
The above approach works when we have to repeat an instruction a small number of times. However, as the number of times you have to repeat the same instruction or set of instructions increases, this approach becomes increasingly unfeasible. What if we now had to print run the instruction 1,000 times or even 1,000,000 times. In order to approach problems like these we need to utilise loops.
The two main types of loops that we'll user are:
- for loops - used for a set number of iterations
- while loop - used when a certain condition is
The While Loop
Used when a certain condition is true
    while (condition) {
    	code block to be executed
    }
Syntax
	var i=0;
	while (i < 5)
	{
  		console.log("Solent University");
  		i++;
	}
Example
The For Loop
Used for a set number of iterations
	for (var i=startvalue; i<endvalue; i=i+increment)
	{
			  // code to be executed
	}
Syntax
	for (var i=0; i<5; i++)
	{
		consoel.log(“Solent University");

	}
Example
Using a for loop to process check boxes
A useful practical application of a for loop in javaScript is to iterate through check boxes. Given that a checkbox has multiple inputs and potentially multiple selections, we can't just access the selected values like we would for a single form input element.
Consider the following form:
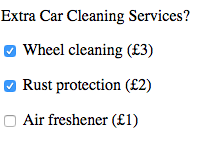
	<form  id="carRental">
            <p>Extra Car Cleaning Services?</p>
            <p><input type="checkbox" name="extras" value="wheelCleaning"> Wheel cleaning (£3) </p>
            <p><input type="checkbox" name="extras" value="rustProtection">  Rust protection (£2) </p>
            <p><input type="checkbox" name="extras" value="airFreshner">  Air freshener (£1) </p>
    </form>
HTML
Below is how we would access each of the checkbox inputs values.
	 var form  = document.getElementById("carRental");

     for(var i = 0; i < form.extras.length; i++) {
         if (form.extras[i].checked){
            //this block of code is executed
            console.log("You selected" + form.extras[i].value);
         }
     }
In the above example, we loop through our checkbox group and simply print out the value attribute if the checkbox has been selected.
Note: form.extras.length returns the number of elements in our checkbox group, in this case it would be 3.
The onChange Event
The onChange event is particularly useful when it's applied to a form. This event will fire whenever a form is updated.
It's implemented as follows:
	<form  id="carRental">
            <p>Extra Car Cleaning Services?</p>
            <p><input type="checkbox" name="extras" value="wheelCleaning"> Wheel cleaning (£3) </p>
            <p><input type="checkbox" name="extras" value="rustProtection">  Rust protection (£2) </p>
            <p><input type="checkbox" name="extras" value="airFreshner">  Air freshener (£1) </p>
    </form>
HTML
function main() {
    var carRentalForm = document.getElementById("carRental");
    carRentalForm.addEventLinstener("change", formChanged);
}

function formChanged(event) {
    console.log("the form has changed");
    // run some validation
   // update some information for the user
}
javaScript